자료수집소

포트 미러링 이란? 본문

< 컴퓨터 >/네트워크

포트 미러링 이란?

stones 2016. 4. 29. 16:57
336x280(권장), 300x250(권장), 250x250, 200x200 크기의 광고 코드만 넣을 수 있습니다.

포트 미러링

위키백과, 우리 모두의 백과사전.

포트 미러링(Port Mirroring)은 네트워크 스위치의 어떤 한 포트에서 보이는 모든 네트워크 패킷 혹은 전체 VLAN의 모든 패킷들을 다른 모니터링 포트로 복제하는데 사용된다. 포트 미러링은 주로 침입 탐지 시스템이나 패시브 프로브 또는 애플리케이션 성능 관리(Application Performance Management, APM)에 필요한 실사용자 모니터링(Real User Monitoring, RUM) 기술과 같이 네트워크 트래픽을 모니터링 해야하는 네트워크 장비들에서 사용된다. 포트미러링은 시스코 스위치에선 일반적으로 스위치 포트 분석기(Switched Port ANalyzer, SPAN) 혹은 원격 스위치 포트 분석기(Remote Switched Port ANalyzer, RSPAN)라 불린다. 다른 제조사들에서는 다른 이름으로 부르곤 하는데, 3Com의 경우 로빙 분석 포트(Roving Analysis Port, RAP)라 부른다.

네트워크 엔지니어/관리자는 포트 미러링을 네트워크상의 데이터를 분석 및 디버그하거나 오류를 진단하는데 사용한다. 포트 미러링은 또한 관리자가 네트워크 성능을 관찰하는데 도움을 주고, 문제가 발생했을 때 이를 알려준다. 또한 인바운드나 아웃바운드 트래픽 중 하나 혹은 전부를 하나 또는 여러개의 인터페이스로 미러링하는데 사용할 수 있다.


1. CISCO 포트 미러링(SPAN) 명령어


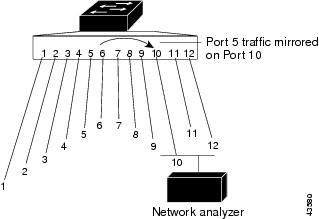
- 포트 gi0/5번 in, out 패킷을  gi0/10번으로 미러링


Switch#config terminal 
Enter configuration commands, one per line. End with CNTL/Z.

Switch(config)#monitor session 1 source interface GigabitEthernet 0/5 
Switch(config)#monitor session 1 destination interface GigabitEthernet 0/10


- 포트 gi0/5번 in 패킷을  gi0/10번으로 미러링


Switch#config terminal 
Enter configuration commands, one per line. End with CNTL/Z.

Switch(config)#monitor session 1 source interface GigabitEthernet 0/5 rx
Switch(config)#monitor session 1 destination interface GigabitEthernet 0/10


- 포트 gi0/5번 out 패킷을  gi0/10번으로 미러링


Switch#config terminal 
Enter configuration commands, one per line. End with CNTL/Z.

Switch(config)#monitor session 1 source interface GigabitEthernet 0/5 tx
Switch(config)#monitor session 1 destination interface GigabitEthernet 0/10


참고자료 : CISCO 가이드----------------------------------


Creating a Local SPAN Session

Follow these steps to create a SPAN session and specify the source (monitored) ports or VLANs and the destination (monitoring) ports.

SUMMARY STEPS

    1.    enable 

    2.    configure terminal 

    3.    no monitor session {session_number | all | local | remote} 

    4.    monitor session session_number source {interface interface-id | vlan vlan-id} [, | -] [both | rx | tx]

    5.    monitor session session_number destination {interface interface-id [, | -] [encapsulation replicate]} 

    6.    end 

    7.    show running-config 

    8.    copy running-config startup-config 


DETAILED STEPS
     Command or ActionPurpose
    Step 1enable 


    Example:
    Switch> enable


    Enables privileged EXEC mode. Enter your password if prompted.


    Step 2configure terminal 


    Example:
    
    Switch# configure terminal


    Enters the global configuration mode.

     
    Step 3no monitor session {session_number | all | local | remote} 


    Example:
    
    Switch(config)# no monitor session all


    Removes any existing SPAN configuration for the session.

    •  

      For session_number, the range is 1 to 66.

    •  

      all—Removes all SPAN sessions.

    •  

      local—Removes all local sessions.

    •  

      remote—Removes all remote SPAN sessions.

     
    Step 4monitor session session_number source {interface interface-id | vlan vlan-id} [, | -] [both | rx | tx] 

    Example:
    
    Switch(config)# monitor session 1 source interface gigabitethernet1/0/1


    Specifies the SPAN session and the source port (monitored port).

    •  

      For session_number, the range is 1 to 66.

    •  

      For interface-id, specify the source port to monitor. Valid interfaces include physical interfaces and port-channel logical interfaces (port-channel port-channel-number). Valid port-channel numbers are 1 to 48.

    •  

      For vlan-id, specify the source VLAN to monitor. The range is 1 to 4094 (excluding the RSPAN VLAN).

      Note   

      A single session can include multiple sources (ports or VLANs) defined in a series of commands, but you cannot combine source ports and source VLANs in one session.

    •  

      (Optional) [, | -] Specifies a series or range of interfaces. Enter a space before and after the comma; enter a space before and after the hyphen.

    •  

      (Optional) both | rx | tx—Specifies the direction of traffic to monitor. If you do not specify a traffic direction, the source interface sends both sent and received traffic.

      •  

        both—Monitors both received and sent traffic.

      •  

        rx—Monitors received traffic.

      •  

        tx—Monitors sent traffic.

        Note   

        You can use themonitor sessionsession_numbersourcecommand multiple times to configure multiple source ports.

     
    Step 5monitor session session_number destination {interface interface-id [, | -] [encapsulation replicate]} 


    Example:
    
    Switch(config)# monitor session 1 destination interface gigabitethernet1/0/2 encapsulation replicate


    Specifies the SPAN session and the destination port (monitoring port).

    Note   

    For local SPAN, you must use the same session number for the source and destination interfaces.

    •  

      For session_number, specify the session number entered in step 4.

    •  

      For interface-id, specify the destination port. The destination interface must be a physical port; it cannot be an EtherChannel, and it cannot be a VLAN.

    •  

      (Optional) [, | -] Specifies a series or range of interfaces. Enter a space before and after the comma; enter a space before and after the hyphen.

    (Optional) encapsulation replicate specifies that the destination interface replicates the source interface encapsulation method. If not selected, the default is to send packets in native form (untagged).

    Note   

    You can use monitor sessionsession_numberdestination command multiple times to configure multiple destination ports.

     
    Step 6end 


    Example:
    
    Switch(config)# end


    Returns to privileged EXEC mode.

     
    Step 7show running-config 


    Example:
    
    Switch# show running-config 


    Verifies your entries.

     
    Step 8copy running-config startup-config 


    Example:
    Switch# copy running-config startup-config 


    (Optional) Saves your entries in the configuration file.


    Creating a Local SPAN Session and Configuring Incoming Traffic

    Follow these steps to create a SPAN session, to specify the source ports or VLANs and the destination ports, and to enable incoming traffic on the destination port for a network security device (such as a Cisco IDS Sensor Appliance).

    SUMMARY STEPS

      1.    enable 

      2.    configure terminal 

      3.    no monitor session {session_number | all | local | remote} 

      4.    monitor session session_number source {interface interface-id | vlan vlan-id} [, | -] [both | rx | tx] 

      5.    monitor session session_number destination {interface interface-id [, | -] [encapsulation replicate[ingress {dot1q vlan vlan-id | untagged vlan vlan-id vlan vlan-id}]} 

      6.    end 

      7.    show running-config 

      8.    copy running-config startup-config 


    DETAILED STEPS
       Command or ActionPurpose
      Step 1enable 


      Example:
      Switch> enable


      Enables privileged EXEC mode. Enter your password if prompted.


      Step 2configure terminal 


      Example:
      
      Switch# configure terminal


      Enters the global configuration mode.

       
      Step 3no monitor session {session_number | all | local | remote} 


      Example:
      
      Switch(config)# no monitor session all


      Removes any existing SPAN configuration for the session.

      •  

        Forsession_number, the range is 1 to 66.

      •  

        all—Removes all SPAN sessions.

      •  

        local—Removes all local sessions.

      •  

        remote—Removes all remote SPAN sessions.

       
      Step 4monitor session session_number source {interface interface-id | vlan vlan-id} [, | -] [both | rx | tx] 


      Example:
      
      Switch(config)# monitor session 2 source gigabitethernet1/0/1 rx


      Specifies the SPAN session and the source port (monitored port).

       
      Step 5monitor session session_number destination {interface interface-id [, | -] [encapsulation replicate[ingress {dot1q vlan vlan-id | untagged vlan vlan-id vlan vlan-id}]} 


      Example:
      
      Switch(config)# monitor session 2 destination interface gigabitethernet1/0/2 encapsulation replicate ingress dot1q vlan 6


      Specifies the SPAN session, the destination port, the packet encapsulation, and the ingress VLAN and encapsulation.

      •  

        Forsession_number, specify the session number entered in Step 4.

      •  

        For interface-id, specify the destination port. The destination interface must be a physical port; it cannot be an EtherChannel, and it cannot be a VLAN.

      •  

        (Optional) [, | -]—Specifies a series or range of interfaces. Enter a space before and after the comma or hyphen.

      •  

        (Optional)encapsulation replicatespecifies that the destination interface replicates the source interface encapsulation method. If not selected, the default is to send packets in native form (untagged).

      •  

        ingress enables forwarding of incoming traffic on the destination port and to specify the encapsulation type:

        •  

          dot1q vlanvlan-id—Accepts incoming packets with IEEE 802.1Q encapsulation with the specified VLAN as the default VLAN.

        •  

          untagged vlan vlan-idor vlan vlan-id—Accepts incoming packets with untagged encapsulation type with the specified VLAN as the default VLAN.

       
      Step 6end 


      Example:
      
      Switch(config)# end


      Returns to privileged EXEC mode.

       
      Step 7show running-config 


      Example:
      
      Switch# show running-config 


      Verifies your entries.

       
      Step 8copy running-config startup-config 


      Example:
      Switch# copy running-config startup-config 


      (Optional) Saves your entries in the configuration file.


      Comments